Placeholder Applications

Read what creators are making

Table of Contents

Handmade / Customized Product Creation

After undergoing the thoughtful design process by creators, the real challenge for handmade products and custom creations lies in the journey towards mass production through outsourcing. Artists frequently find themselves in a loop of revisions and sample checks with manufacturers to nail the perfect execution. And when an artist’s custom order is on the smaller side, there’s the all-too-common hurdle of manufacturing costs blowing past the budget. Caught between the high costs of communication and production, creators might see their projects indefinitely postponed.

Recognizing the unique demands of handmade and custom products, which require efficiency, cost savings, and versatility, without being limited to just engraving and cutting materials, FLUX has deeply invested in the field of creator tools. We understand that vibrant color printing is as crucial as the craftsmanship itself for bringing these products to life. In an effort to meet creators’ needs for both prototyping and small batch production, we  have integrated color printing capabilities into our laser engraving machines, opening up new possibilities for creators.

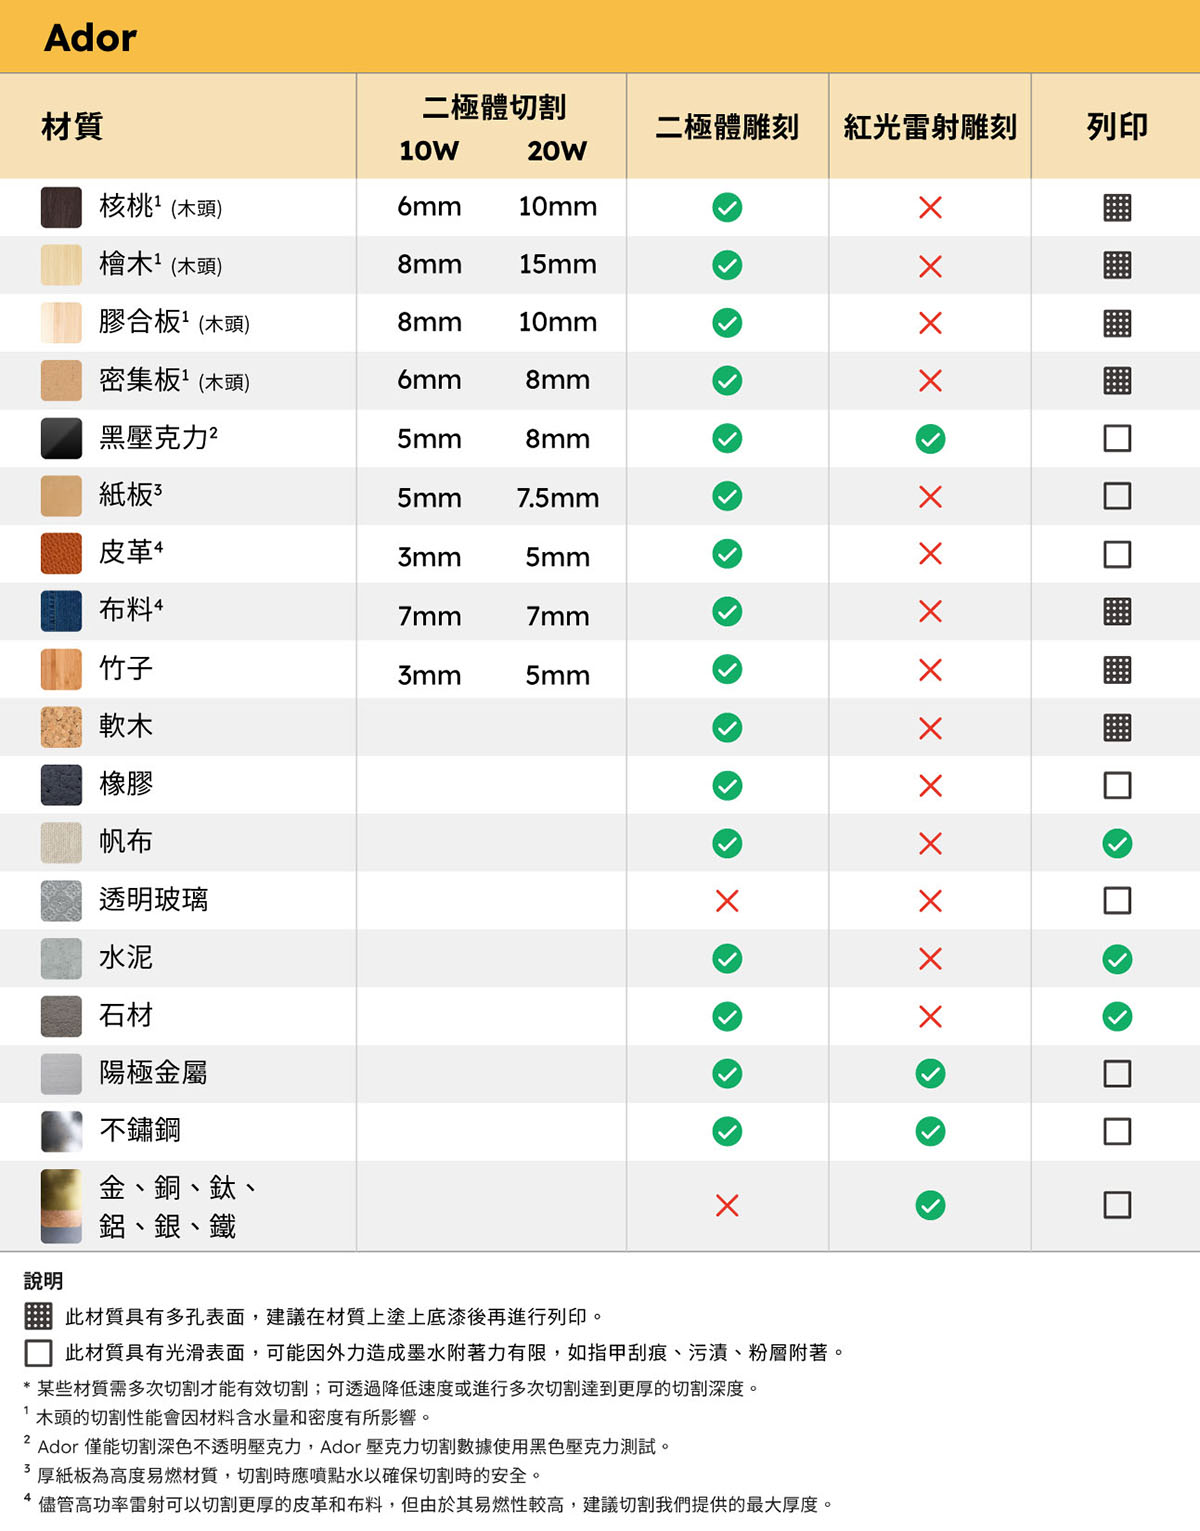
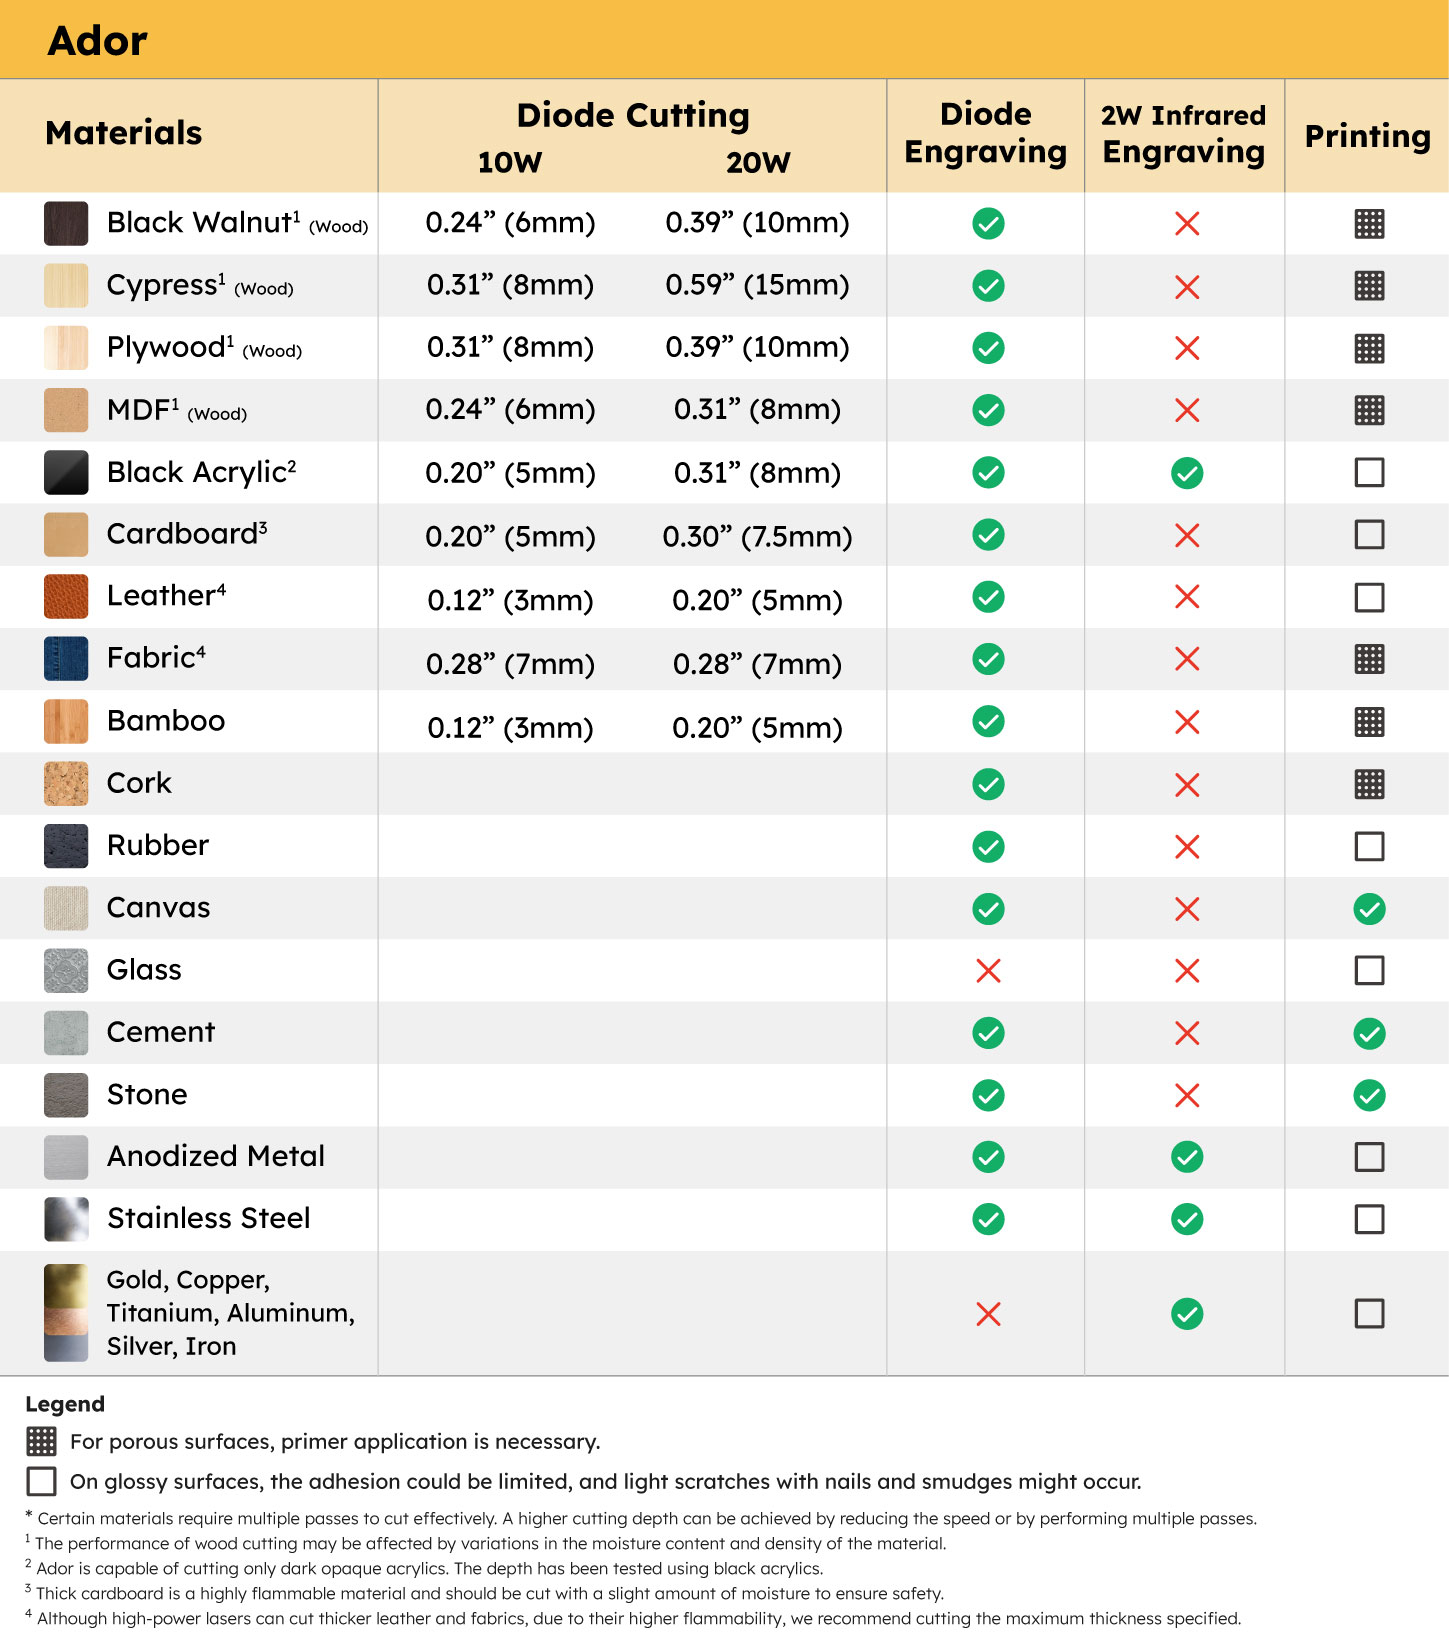
At the end of 2023, FLUX introduced the Ador, a 3-in-one color printing laser cutter designed for engraving, cutting, and printing. This machine features a 20W diode laser module, perfectly suited for creators working with leather and canvas, capable of cutting up to 3mm in leather and up to 5mm in fabric. It’s especially handy for those looking to work with materials like leather and canvas. Additionally, Ador smoothly handles the engraving and cutting of common laser materials such as plywood, plant fiberboard, and black acrylic, with the ability to cut up to 8mm, ensuring an efficient creative process for creators focused on product design. Apart from the diode laser module, Ador is equipped with a 2W infrared laser add-on for metal engraving and a color printing add-on. This allows users to interchange module heads for a broader range of material applications, significantly broadening their creative horizons.

Laser Cut MDF Fridge Magnets

In this lesson sharing, we’ll walk you through how to create a custom MDF magnet using Ador, complete with engraving, cutting, and color printing—all in one shot. That’s right! Your own hand-drawn illustrations can be turned into unique products, allowing you to bring your creative visions to life on a variety of materials. But before we dive in, make sure to follow our guide for gathering and preparing your materials!

Preparing Image Files - A Tutorial on Setting the Frame

If you have your own illustration design, begin by adding a cutting frame to the image file before exporting it with the original artwork. Alternatively, when using Beam Studio software, you can vectorize the image file and navigate to “Edit” > “Path” > “Offset.” This step prompts the software to automatically generate a cutting frame for your design.

We’ve got a special treat for you—a set of intricately dessert illustrations design file available for everyone to download at no cost and use for your creative projects. This exclusive collection features five hand-drawn desserts and food shapes, ideal for creating fridge magnets, hanging decorations, and more with a laser cutter.

Looking to showcase your designs to a wider audience? Upload your creations to the Design Market, a digital marketplace for laser cutting files, and open your online design store. It’s a fantastic way to start a side gig and monetize your amazing artwork.

Preparing Materials

When it comes to wood materials, you’ve got a ton of options, each with its own unique color and texture. But for projects that involve engraving, cutting, and printing with Ador, you’ll want to stick with materials that won’t easily crack or warp. Our top picks? Birch plywood, Poplar plywood, or MDF (Medium Density Fiberboard). And if you’re aiming to add a bit of depth to your work, go for panels that are between 3mm and 5mm thick. Anything thinner might not capture the full vibrancy of your creation.
Poplar plywood is ideal for creators looking to achieve bright, vividly colored prints on their artwork. Its pale white color, coupled with a fine, uniform grain and subtle lines, offers a mild and easy-to-work-with material. This wood’s fine grain makes it a breeze to process, whether by hand or laser, and it stands up well to sanding, staining, and polishing for a smooth finish. It ensures even color in engravings and clean, non-charred edges in laser cuts, breaking cleanly for precise work.
MDF Board is a type of New Zealand Dense Plate, is highly recommended for creators aiming for bright and colorful prints on their projects. This material has a light color, stability, and ease of cutting. It surpasses the quality of Asian Dense Plates with fewer surface imperfections. Compliant with green VOC standards, it’s an excellent choice for a wide range of applications including crafts, furniture, decor, building materials, and laser cutting projects.
Walnut Plywood stands out with its yellowish-brown hue and special patterns, such as parabolic shapes on the cut surface and straight grains radially. It’s known for its fine texture, high hardness, and excellent resistance to impact, compression, and moisture, making it less prone to warping. This durability is perfect for furniture making. While walnut plywood adds a vintage look to projects, its rich color might overshadow bright design colors. For the best compatibility with FLUX design files, opting for lighter-colored wood is recommended. Ensure you choose the right board for your project!
Birch plywood, known for its light color, is ideal for projects that involve color inkjet printing. Basswood, featuring a creamy white hue, is characterized by its fine, even grain and subtle straight lines. This wood is mild, resistant to cracking and warping, and its fine grain makes it easy to handle, durable, and capable of achieving a smooth finish through sanding, staining, and polishing. It’s suitable for both hand crafting and laser processing, ensuring the edges of laser cuts don’t easily blacken or break.
To give your magnets that extra 3D pop, stick to this order: first engrave, then print, and cut last. As for switching things up with the modules, it’s diode module, then printing module, and back to diode module. FLUX provides .svg files for your engraving and cutting needs, plus .png files for printing. Make sure to download both to your computer and you’re all set.

Part 1 Camera Calibration

If it’s your first time firing up Ador, or if you’ve moved the machine since your last project, be sure to run a camera calibration. This step is crucial to dodge any mishaps while laser cutting and engraving. Check out the FLUX Help Center for a step-by-step on calibration. And don’t just breeze through it—make sure to double-check the calibration results once you’re done. After nailing the camera calibration, you’re good to go on that first engraving. For a clear guide on confirming your calibration, dive into the tutorial video and remember to turn on those CC subtitles for extra clarity.

Part 2 Laser Engraving

After calibrating the camera, you’re ready to dive into making your magnet. The .svg files from FLUX are already organized with separate layers for cutting and engraving, so remember to hide the cutting layer while engraving! Also, before you start tweaking the settings, make sure to complete an “Auto Focus” to adjust the distance between the laser head and the material correctly before each engraving and cutting step.
Auto Focus: Place the material inside the machine, move the laser head above the material, then double-click the focus button on the left side of the machine or press and hold the “AF” button on the machine’s panel until the laser head activates. Once the laser head touches the material and then moves back up, focusing is complete. Before each engraving, always make sure the focus distance is correct.
Camera Preview: Start with a camera preview to confirm the placement of your material and the engraving position of your design file. The camera lens for the preview is located on the lid, so remember to close the lid during the preview. Otherwise, you might end up with a selfie!
Parameter Setting: Once you’ve wrapped up the camera preview and have your design file’s placement nailed down, it’s time to dive into setting your parameters. Beam Studio offers suggested settings, but feel free to tweak these based on the color or texture of your material. This flexibility allows you to tailor the engraving or cutting depth to achieve the best possible outcome for your project. If you’re also using the MDF board for your magnet, the recommended engraving parameters are: Power: 40 / Speed: 250. For a detailed walkthrough on laser engraving settings, check out the tutorial video below.

Part 3 Color Printing

Once you’ve finished engraving, it’s time for the highlight of this project – color printing! Before you dive into the setup, remember to swap out the diode module for the printing module head. If it’s your first time venturing into a project with the printing module, you’ll need to calibrate the camera before getting started. For a step-by-step guide, head over to the help center’s tutorial.
Start by importing your files for camera preview. Align it with the engraved area and adjust the ink saturation to kick off your color printing. Creators can tweak the ink volume based on the color tones of the image and personal preference. If your material is on the lighter side, consider reducing the saturation to prevent the colors from becoming too vivid and distorting the final product. Once the file is sent, follow the prompts on the Ador smart panel to change ink colors, completing the printing process.
Parameter Setting
Printing Proccess

Part 4 Laser Cutting

Once the color printing is done, it’s time for the last step: cutting out your engraved and printed masterpiece from the material with the diode laser . First, swap out the printing module for the diode module and refocus the material. Next, reveal the cutting layer that was hidden during engraving, and align the cutting paths with your design. Ensure the engraving and printing layers are hidden to avoid any overlap issues. With the wood preset cutting parameters from Beam Studio , you’re ready to send off the file for cutting.

Impressed by Ador’s capabilities? Beyond wood, Ador can engrave, cut, and print on a variety of materials, pushing the boundaries of laser crafting! If you’re intrigued by what Ador has to offer, head over to the FLUX official website now to discover more about this machine’s capabilities.

Ador

The World’s First Color
Printing Laser Cutter

laser cutter beamo product

beamo

The World’s Smallest
CO2 Laser Cutter/Engraver

laser cutter beambox product

Beambox

The Smart Desktop
Laser Cutter & Engraver

HEXA

Beyond
Your Profession

全彩登場,
雷切機上也能玩出無限色彩。

beamo II 搭載 30W CO2 雷射,不只是精細、強勁,更是你實現創意的最好夥伴。無論是木頭、皮革、紙板、布料,甚至透明或絢彩壓克力,都能俐落切割、細膩雕刻。不再被材質限制,不再被靈感耽誤。只要一台 beamo II,所有點子,都能成真。

寵物吊牌

客製化吊飾

金屬餐具

客製鑰匙鏈

立即解鎖全金屬雕刻

無論是客製化的金屬飾品、獨一無二的獎牌,還是專屬標牌和工具,beamo II 的 2W 紅光雷射頭都能雕刻出細膩、清晰的圖案與文字,金屬不再是你創作的阻礙。


全彩登場,
雷切機上也能玩出無限色彩。

beamo II 搭載 30W CO2 雷射,不只是精細、強勁,更是你實現創意的最好夥伴。無論是木頭、皮革、紙板、布料,甚至透明或絢彩壓克力,都能俐落切割、細膩雕刻。不再被材質限制,不再被靈感耽誤。只要一台 beamo II,所有點子,都能成真。

個性貼紙

電腦模型

客製服飾

客製立牌

四色整合,從靈感到成品一步到位。

靈感一來,直接上色。beamo II 配備 CMYK 四色墨水系統,一次完成完整色彩輸出。四色整合的設計,讓每一筆、每一道顏色,都能同時呈現,層次飽滿、細節出色。從靈感萌生到成品誕生,一氣呵成。讓你的創作,不只快,還更美。

搭配 CO2 雷射,創作更多元。

黑白,不再是雷切機的唯一選項。beamo II 開創先例,成為全球首台搭載彩色列印的 CO2 雷射切割機,一次噴印 CMYK 四色,色彩純淨、層次分明,品質更勝以往。不論是細膩的漸層、飽滿的圖案,還是豐富的設計細節,beamo II 都能完美呈現,讓每個作品都充滿生命力。

600 DPI,彩印精度也講究。

beamo II 提供高達 600 DPI 的彩印精度,讓每一個顏色都更飽滿、更細膩。漸層的柔和、細線的銳利、明暗的層次,都能被真實還原,作品質感一眼就能看見。無論是專業的作品集,還是獨一無二的禮物,都能印出讓人驚艷的細節。用 beamo II,把每個顏色都做到最好,成就每一次創作的高質感。

30W CO2 雷射,
精細的剛剛好。

beamo II 搭載 30W CO2 雷射,不只是精細、強勁,更是你實現創意的最好夥伴。無論是木頭、皮革、紙板、布料,甚至透明或絢彩壓克力,都能俐落切割、細膩雕刻。不再被材質限制,不再被靈感耽誤。只要一台 beamo II,所有點子,都能成真。

生日立牌

客製化寵物碗

益智遊戲

客製化冰壩杯

雕切隨心所欲。

beamo II 讓創意不只是想法,而是隨手可得的作品。從精緻小物到獨特禮品,從課堂實驗到專業設計,它都能輕鬆完成。每一次切割與雕刻,都是把靈感化為真實的瞬間。

1000 DPI,經得起看。

即使再細微的紋理、再複雜的圖案,beamo II 也能清晰呈現。高達 1000 DPI 的精細度。無論是精緻吊飾、獨一無二的禮物,還是要求嚴苛的專業作品,即使放大檢視,也依然完美無瑕。

搭配彩色列印,創作更多元。

黑白,不再是雷切機的唯一選項。beamo II 開創先例,成為全球首台搭載彩色列印的 CO2 雷射切割機,一次噴印 CMYK 四色,色彩純淨、層次分明,品質更勝以往。不論是細膩的漸層、飽滿的圖案,還是豐富的設計細節,beamo II 都能完美呈現,讓每個作品都充滿生命力。

當創作需要更大的舞台

想挑戰更厚的材料,或者開啟更進階的創作玩法?加上 beamo II 的擴充底座套件後,從原本的 3 公分提升到 15.5 公分,厚木板、立體物件都能輕鬆放入。搭配擴充底座即刻解鎖使用自動送料和夾爪旋轉軸這兩個套件,解鎖更多創作可能。

當靈感需要更長的篇幅

想挑戰更厚的材料,或者開啟更進階的創作玩法?加上 beamo II 的擴充底座套件後,從原本的 3 公分提升到 15.5 公分,厚木板、立體物件都能輕鬆放入。搭配擴充底座即刻解鎖使用自動送料和夾爪旋轉軸這兩個套件,解鎖更多創作可能。

圓柱體、球型也難不倒

創作,不該只有平面。beamo II 的夾爪旋轉軸套件輕鬆把創意延伸到各種立體物件上。從玻璃水杯、酒瓶到棒球,都能變成你的獨一無二創作。

*此套件需搭配擴充底座套件

創作空間更乾淨的解法

創作時,靈感需要自由呼吸,你也一樣。搭配 Beam Air 空濾機,不必擔心雷射雕刻時產生的煙塵與異味,它能高效過濾工作中產生的污染,保持空氣乾淨清新。不論是在家、工作室還是店面,Beam Air 都能守護你的環境,讓你更安心、專注地投入每一次創作。


一次看懂兩代的不同